This is a test of my first YouTube Video.
If this works you should see a short video on how to customize the toolbars in CG for Intellicad.
I have some other ideas for useful videos. If you have something you'd like to see, let me know.
Larry P
Sunday, September 6, 2009
Saturday, June 27, 2009
The details are finally in.... ArcView for Free
In the most exciting software related news I've heard in years ESRI and Carlson have joined forces to better serve their clients. As I indicated in my last post, we were just waiting on the details. The details are in.
All users of a Carlson product based on the Intellicad Engine will receive a GIS Starter Kit.
The kit contains:
Wow. There is some awesome and powerful stuff here.
So, I hope some of you are wondering, how do I get the GIS Starter Kit?
Call 1-800-GIS-XPRT (1-800-447-9778). You will need to tell them you are a Carlson ICAD user and want the kit.
When I called they asked me where I was located and told me to send an email request to an ESRI employee who was assigned to my territory.
In my email I was to include:
In a week I received my package and have been learning some really cool stuff every day since.
A few days before I received the package I got an email from ESRI. When you get this email, print it. The email contains registration information you'll need when you install your software.
There are some important things to understand about the free offer.
They have limited the offer to one free starter kit per company. (That does not seem unreasonable since they are giving people $1,700 worth of products.)
You need to provide the physical address because they ship the products via UPS.
You will want to have some time to devote to learning the software once you install it. The data that is available is mind boggling. This might be a really great time to think about setting up a company GIS to track your jobs.
If anyone isn't sure whether or not they qualify, or has any questions about the GIS Starter Kit, please do not hesitate to contact me at 336-846-1101. If you are using CG 7, or 8 or 9, this might be a good time to think about upgrading. The good news those who upgrade now should be eligible for a free copy of the next release which is due out in the next couple of months.
Larry P
All users of a Carlson product based on the Intellicad Engine will receive a GIS Starter Kit.
The kit contains:
ArcView 9.3.1
GIS Tutorial (a great book with step by step instructions to get you started)
A to Z GIS (dictionary of important GIS terms)
ArcView Data & Maps 9.3.1 (5 data dvd's)
- Data and Maps and StreetMap North America
- Global Imagery and Shaded Relief - North and South America
- Global Imagery and Shaded Relief - Europe and Africa
- Global Imagery and Shaded Relief - Asia and Australia
- Elevation and Image Data - World
Wow. There is some awesome and powerful stuff here.
So, I hope some of you are wondering, how do I get the GIS Starter Kit?
Call 1-800-GIS-XPRT (1-800-447-9778). You will need to tell them you are a Carlson ICAD user and want the kit.
When I called they asked me where I was located and told me to send an email request to an ESRI employee who was assigned to my territory.
In my email I was to include:
Name
Company Name
Physical address
Mailing address
telephone #
email address
Carlson with Intellicad Serial #
In a week I received my package and have been learning some really cool stuff every day since.
A few days before I received the package I got an email from ESRI. When you get this email, print it. The email contains registration information you'll need when you install your software.
There are some important things to understand about the free offer.
They have limited the offer to one free starter kit per company. (That does not seem unreasonable since they are giving people $1,700 worth of products.)
You need to provide the physical address because they ship the products via UPS.
You will want to have some time to devote to learning the software once you install it. The data that is available is mind boggling. This might be a really great time to think about setting up a company GIS to track your jobs.
If anyone isn't sure whether or not they qualify, or has any questions about the GIS Starter Kit, please do not hesitate to contact me at 336-846-1101. If you are using CG 7, or 8 or 9, this might be a good time to think about upgrading. The good news those who upgrade now should be eligible for a free copy of the next release which is due out in the next couple of months.
Larry P
Thursday, April 9, 2009
More big news from the Users Conference
Besides the announcement that the next version of C&G will be included within Carlson Survey there was another big announcement.
Brent Jones of ESRI did a fabulous job as keynote speaker at the conference. Among the things he announced was:
... an upcoming grant program to be offered by ESRI for every Carlson IntelliCAD user. "ESRI is very supportive of Carlson’s development on IntelliCAD and we want to support your users," said Jones of this specialized grant program being developed exclusively for Carlson IntelliCAD users. "We want to help surveyors leverage their existing resources to help in the GIS market." With this offer Carlson IntelliCAD users will be able to access GIS technology and jump-start a GIS practice.
Hummm. Why is that important to CG users? With this next release, CG users will be Carlson IntelliCAD users. Well, you will be a Carlson IntelliCAD user unless you choose to upgrade to Carlson with the AutoCAD OEM embedded.
Ok, so what exactly does the "grant program" mean? Who exactly will qualify? When will this happen? Which ArcView products are involved? At this point, I can not say. The final details are being worked out.
What I can say is, the association of Carlson and ESRI should lead to really great things for us users.
Larry P
Big News for CG Users
I just returned from the 2nd Carlson Users conference. There is big news for CG Users.
A few years ago Bruce Carlson and I had a conversation in his office. He told me it made no sense to pay different sets of programmers to solve exactly the same problems. Of course, he was right. The problem was how to integrate the Carlson approach to solving a survey problem and the C&G approach to solving those same problems. I'll admit, I was skeptical.
So when will the two products become one? It took some time, but the day is fast approaching. Carlson announced that the next version of Carlson Survey will include C&G software. That's right. Next time you upgrade your C&G software you will receive both C&G and Carlson Survey for the same price.
For us long term devotees of C&G software this might seem like a bad thing. It isn't. In fact, this is one of the best things I've heard lately. With many software upgrades the users receives a hand full of new routines and some limited improvements in others. When the user upgrades this time it will come with tons of new tools. Will it take some time to learn to take advantage of all the new routines? Yes. But the fact we have the new tools puts the power in the hands of us users. I like that. I hope you will too.
This leaves us with an important question. When will the new version of Carlson Survey (with CG Survey) be released? The "official" word is they hope to release by sometime in June. Of course, the programmers hesitate to speculate on release dates. They know well how unforeseen problems can cause needed delays. I personally believe we users can expect to see something in our hands sometime this summer. That is exciting news.
Larry P
Sunday, October 19, 2008
The next version of C&G is available
The next version of C&G is now available for download from the Carlson Download page**.
This newest version (CG 19) works with your existing seat of AutoCAD or installs an Intellicad engine.
I've been on the road for the past week +. So far I've not had a chance to install and check out this version. Hope to have a proper review later this week.
For anyone who wants to check it out, give me a call at the office and I'll get you a demo serial number.
Larry P
800-533-4387
** Choose the CGSurvey for Autocad and CGSurvey 19 options
Wednesday, October 8, 2008
Using Color Tables
I've found that helping people understand complex maps is much easier with the liberal use of color. I don't mean color on your computer monitor. We all have that. I mean color on paper.
Trust me it sounds harder than it is. Let me show you how.
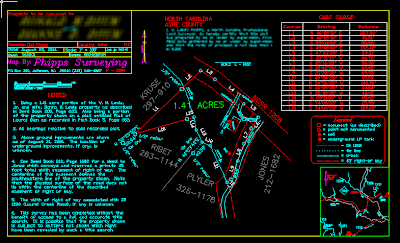
Figure 1 is a screen cap of a fairly typical map from my files.
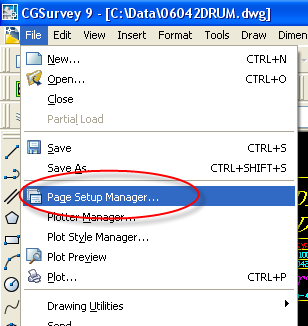
When preparing a version to share with clients (at least those without AutoCAD) we start by creating a new Page Setup. Do this by going to File>Page Setup Manager
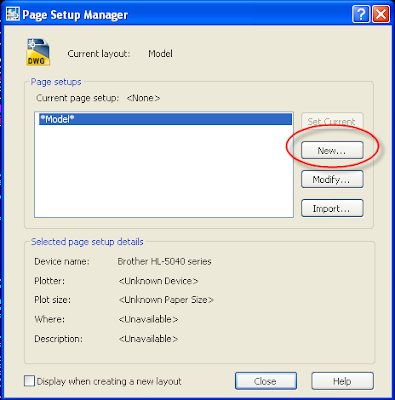
This will bring up the Page Setup Manager dialog box. We want to create a New Page Setup
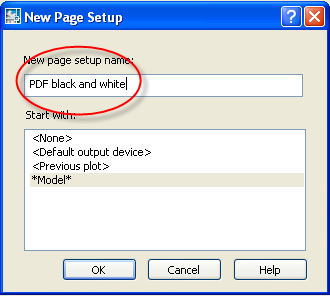
The New Page Setup Dialog box allows us to name our new Page Setup. I'm going to call mine PDF black and white. (Quick side note: I strongly encourage users to use names that are descriptive.)
There are several options to be set when the Page Setup dialog box appears. Let's focus on just those involved with printing in color or black and white. (If my readers want more on Page Setups just let me know.)
First, we see that the current color table is set to a file called Phipps_Survey_b-w.ctb. To edit that table we click the icon just to the right of the color table name.

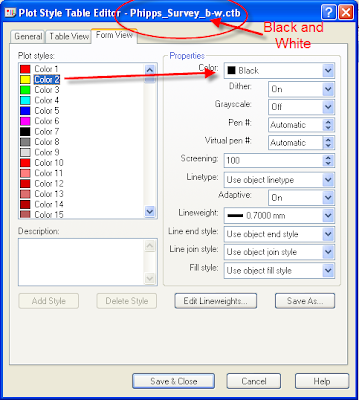
The Plot Style Table Editor box tells us the name of the file being edited at the top (in this case Phipps_Survey_b-w.ctb)
Here we see Color 2 is set to print in Black.
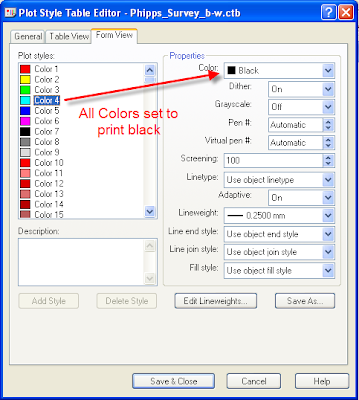
Here we see Color 4 was set to print in Black. This particular table, because it is a black and white table should have all colors set to Black.
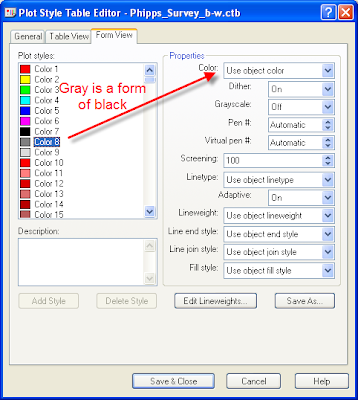
 Well, almost all the colors are set to Black. I actually keep the gray colors gray. Turns out Gray is a perfectly valid color even on a black and white printer. Plus, I've found that using Gray for certain items can be quite useful.
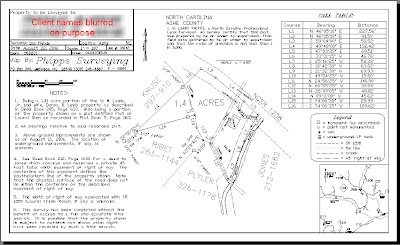
Here we see a preview of the map as it will look when the file is created. (Except where I modified the image to blur the client names.)
 Ok, so how do we do color? I'm glad you asked.
I've gone back to my Page Setup Manager and created a Page Setup named PDF partial color. By default, the black and white color table (Phipps Survey_b-w.ctb) is current. Edit that table by left mouse click on the icon next to the table name.

Turns out the creek in my map is drawn using Color 130. To plot all items drawn using Color 130 in color, we edit the Color Table. Set Color 130 to use object color. Then save the table with a new name.

When the Save As dialog box comes up be sure and use a name that is descriptive. You should be able to tell at a glance exactly what the table does for you. In this case I use Phipps_Survey_part color.ctb.
 Once this table has been saved we will be returned to the Page Setup dialog box.
We've done Step 1 (Create the new setup). Step 2 is to assign the new Phipps_Survey_part color.ctb as the active color table for this page setup.

When we left click on OK to finish creating this Plot Style we will be asked if we wish to assign the table to all layouts. For most users the answer will be yes. (Advanced users who need to say No will know.)
 When we preview the file we see the creek is now plotted using Color 130.
 That is good; but, it's not the whole story. Some colors work well on a computer monitor but not so well on paper or in a pdf file. Colors with a high yellow content can be very difficult to see on paper.
The good news is we do not have to stick with the color we drew on the screen. In fact you can edit your color table to plot any other color you wish. Here we see I've edited my part color table to plot in Red.

This preview shows the creek is now drawn in Red. If we looked on the screen at the drawing we wouldn't see any difference in the file. The Red only shows up when we use the use the Plot Style to "print" the map.

Finally, if we go back to our color table, we can create a full color table by selecting all the colors from the Plot styles shown on the left, then assigning all the colors to plot using the object color. Be sure and use the Save As function with a name that makes sense.

As you can see, I use a file name that includes my company name and the fact that this table plots using full color.

We now have 3 color tables from which we can choose depending our needs.

Along the way I saved each Page Setup to this drawing. Each Setup has been named so I can tell it's purpose at a glance.

That covers the basics. If anyone has specific questions they'd like answered, send me an email and I'll see what I can do.
Larry P
Trust me it sounds harder than it is. Let me show you how.
Figure 1 is a screen cap of a fairly typical map from my files.
Figure 1.

When preparing a version to share with clients (at least those without AutoCAD) we start by creating a new Page Setup. Do this by going to File>Page Setup Manager
Figure 2.

This will bring up the Page Setup Manager dialog box. We want to create a New Page Setup
Figure 3.

The New Page Setup Dialog box allows us to name our new Page Setup. I'm going to call mine PDF black and white. (Quick side note: I strongly encourage users to use names that are descriptive.)
Figure 4.

There are several options to be set when the Page Setup dialog box appears. Let's focus on just those involved with printing in color or black and white. (If my readers want more on Page Setups just let me know.)
First, we see that the current color table is set to a file called Phipps_Survey_b-w.ctb. To edit that table we click the icon just to the right of the color table name.
Figure 5.

The Plot Style Table Editor box tells us the name of the file being edited at the top (in this case Phipps_Survey_b-w.ctb)
Here we see Color 2 is set to print in Black.
Figure 6.

Here we see Color 4 was set to print in Black. This particular table, because it is a black and white table should have all colors set to Black.
Figure 7.
 Well, almost all the colors are set to Black. I actually keep the gray colors gray. Turns out Gray is a perfectly valid color even on a black and white printer. Plus, I've found that using Gray for certain items can be quite useful.
Figure 8.

Here we see a preview of the map as it will look when the file is created. (Except where I modified the image to blur the client names.)
Figure 9.
 Ok, so how do we do color? I'm glad you asked.
I've gone back to my Page Setup Manager and created a Page Setup named PDF partial color. By default, the black and white color table (Phipps Survey_b-w.ctb) is current. Edit that table by left mouse click on the icon next to the table name.
Figure 10.

Turns out the creek in my map is drawn using Color 130. To plot all items drawn using Color 130 in color, we edit the Color Table. Set Color 130 to use object color. Then save the table with a new name.
Figure 11.

When the Save As dialog box comes up be sure and use a name that is descriptive. You should be able to tell at a glance exactly what the table does for you. In this case I use Phipps_Survey_part color.ctb.
Figure 12.
 Once this table has been saved we will be returned to the Page Setup dialog box.
We've done Step 1 (Create the new setup). Step 2 is to assign the new Phipps_Survey_part color.ctb as the active color table for this page setup.
Figure 13.

When we left click on OK to finish creating this Plot Style we will be asked if we wish to assign the table to all layouts. For most users the answer will be yes. (Advanced users who need to say No will know.)
Figure 14.
 When we preview the file we see the creek is now plotted using Color 130.
Figure 15.
 That is good; but, it's not the whole story. Some colors work well on a computer monitor but not so well on paper or in a pdf file. Colors with a high yellow content can be very difficult to see on paper.
The good news is we do not have to stick with the color we drew on the screen. In fact you can edit your color table to plot any other color you wish. Here we see I've edited my part color table to plot in Red.
Figure 16.

This preview shows the creek is now drawn in Red. If we looked on the screen at the drawing we wouldn't see any difference in the file. The Red only shows up when we use the use the Plot Style to "print" the map.
Figure 17.

Finally, if we go back to our color table, we can create a full color table by selecting all the colors from the Plot styles shown on the left, then assigning all the colors to plot using the object color. Be sure and use the Save As function with a name that makes sense.
Figure 18.

As you can see, I use a file name that includes my company name and the fact that this table plots using full color.
Figure 19.

We now have 3 color tables from which we can choose depending our needs.
Figure 20.

Along the way I saved each Page Setup to this drawing. Each Setup has been named so I can tell it's purpose at a glance.
Figure 21.

That covers the basics. If anyone has specific questions they'd like answered, send me an email and I'll see what I can do.
Larry P
Saturday, September 27, 2008
Inserting a Block into your default template
This time let's talk about inserting a block into your drawing template.
There are two Phases to this operation. Phase I involves getting the block into a drawing. For Phase II we save that drawing as our template.
__________________________
Phase I
We begin by starting C&G then going to the Insert > Block Menu. It is important you use a fresh Drawing1.dwg.
This action opens the Insert Block Dialog Box.
The Name field shows blocks which are already in your drawing. (To see a list of all the blocks in the drawing choose the choices button to the left of the name field.)
If you saved the drawing with a preview button you will be able to preview the image in the upper right corner of the dialog box.
Because we want to add a block that is not already part of the drawing we choose the Browse Button.
Choosing Browse Opens the Select Drawing File dialog box. We then navigate to the appropriate location and choose the drawing to insert as a block. In this example we will insert a drawing called C-18.dwg
We choose C-18 by using your mouse to left click on the name from the list of drawings stored in the active folder. If we left click once we see a preview in the upper left of the dialog box. We can also hover our mouse and (depending on your system settings) we will see an information box appear. When we are satisfied this is the file we want, we can double left click the file name or we can left click once then move the mouse down to the lower left and click open.
"Opening" the drawing will take us back to our drawing. The block will be on your cursor. You can move your mouse to place the block.
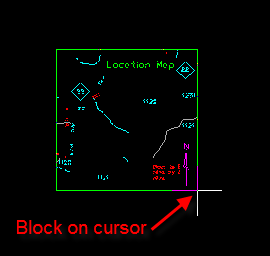
In this case however, do not do that. Instead, use the escape key to stop placing the block. Even though you did not place the block on the screen it is now part of the drawing.
_____________________
Phase II
Now that we have the block in Drawing1.dwg we want to make that our default template.
Here is how we do that.
From the Pull down menu go to File >Save. (You can use the keyboard shortcut or toolbar icon if you wish as either of those will get exactly the same result.)
 Executing this command brings up the Save Drawing As dialog box. (Note that this box only appears the first time you save a drawing. If you have a drawing that has already been saved and wish to save a copy you should use the File>Save As command.)
By default the Save As dialog box will save the drawing as a standard AutoCAD drawing file. This means you get a dwg file type. But that is not what we want.

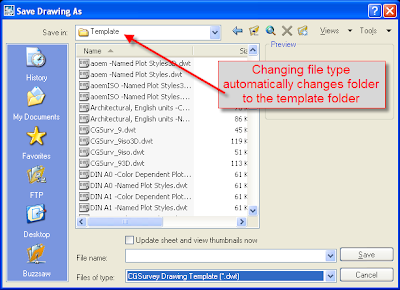
We want to save our drawing as a template. So we have to change the file type shown at the bottom of the dialog box. We want to save as an AutoCAD template. Template files have a dwt extension.

When we change the Files of Type box to dwt the program automatically changes the current folder to the template storage folder.
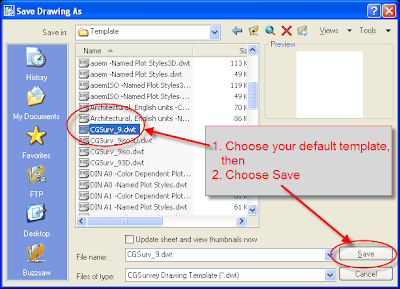
For CG 9 the default template is named CGSurv_9.dwt. (For CG 8 the default template name is CGSurv_8.dwt. For CG 7 the default is CGSu.dwt.)
Locate your default template and either double left click the file name or left click once then left click open.
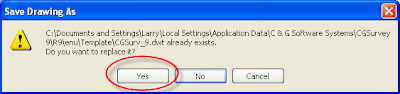
When you save a file with the same name as a file that already exists, you will get a warning box asking if you want to overwrite the existing file. In this case we do so choose Yes.
Next, we get a Template Description Dialog Box. If you wish you can type a detailed description of the template and what it is designed to do. Or, if you wish you can leave the box blank. Either way this box provides input to the user and will not in any way affect your actual drawings. When you finish typing (or not typing) left click Ok.
Your block is now a part of the drawing. To check you can go to the Insert>Block menu for confirmation.

If you wish to make other changes to your template now is a good opportunity to do so.
When you have finished making those changes, I recommend closing then restarting
the program.
I will get into more details concerning blocks in a future post. Please subscribe to my blog feed or check back regularly.
Larry P
There are two Phases to this operation. Phase I involves getting the block into a drawing. For Phase II we save that drawing as our template.
__________________________
Phase I
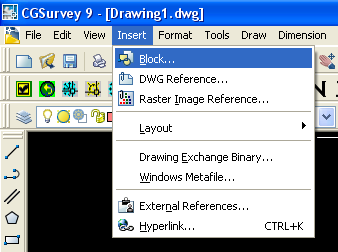
We begin by starting C&G then going to the Insert > Block Menu. It is important you use a fresh Drawing1.dwg.
Figure 1.

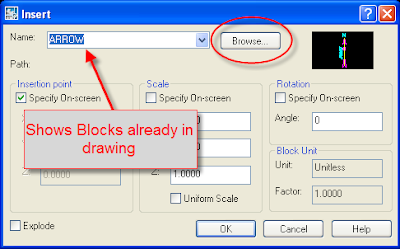
This action opens the Insert Block Dialog Box.
The Name field shows blocks which are already in your drawing. (To see a list of all the blocks in the drawing choose the choices button to the left of the name field.)
If you saved the drawing with a preview button you will be able to preview the image in the upper right corner of the dialog box.
Because we want to add a block that is not already part of the drawing we choose the Browse Button.
Figure 2.

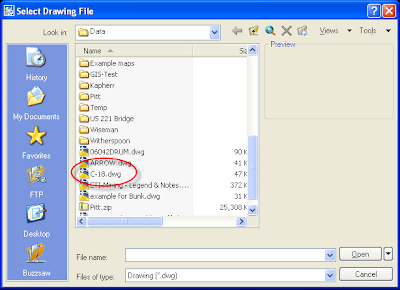
Choosing Browse Opens the Select Drawing File dialog box. We then navigate to the appropriate location and choose the drawing to insert as a block. In this example we will insert a drawing called C-18.dwg
Figure 3.

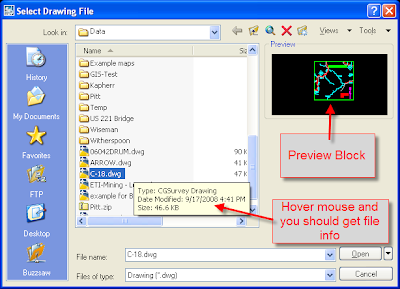
We choose C-18 by using your mouse to left click on the name from the list of drawings stored in the active folder. If we left click once we see a preview in the upper left of the dialog box. We can also hover our mouse and (depending on your system settings) we will see an information box appear. When we are satisfied this is the file we want, we can double left click the file name or we can left click once then move the mouse down to the lower left and click open.
Figure 4.

"Opening" the drawing will take us back to our drawing. The block will be on your cursor. You can move your mouse to place the block.
Figure 5.

In this case however, do not do that. Instead, use the escape key to stop placing the block. Even though you did not place the block on the screen it is now part of the drawing.
_____________________
Phase II
Now that we have the block in Drawing1.dwg we want to make that our default template.
Here is how we do that.
From the Pull down menu go to File >Save. (You can use the keyboard shortcut or toolbar icon if you wish as either of those will get exactly the same result.)
Figure 6.
 Executing this command brings up the Save Drawing As dialog box. (Note that this box only appears the first time you save a drawing. If you have a drawing that has already been saved and wish to save a copy you should use the File>Save As command.)
By default the Save As dialog box will save the drawing as a standard AutoCAD drawing file. This means you get a dwg file type. But that is not what we want.
Figure 7.

We want to save our drawing as a template. So we have to change the file type shown at the bottom of the dialog box. We want to save as an AutoCAD template. Template files have a dwt extension.
Figure 8.

When we change the Files of Type box to dwt the program automatically changes the current folder to the template storage folder.
Figure 9.

For CG 9 the default template is named CGSurv_9.dwt. (For CG 8 the default template name is CGSurv_8.dwt. For CG 7 the default is CGSu.dwt.)
Locate your default template and either double left click the file name or left click once then left click open.
Figure 10.

When you save a file with the same name as a file that already exists, you will get a warning box asking if you want to overwrite the existing file. In this case we do so choose Yes.
Figure 11.

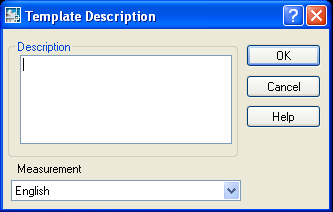
Next, we get a Template Description Dialog Box. If you wish you can type a detailed description of the template and what it is designed to do. Or, if you wish you can leave the box blank. Either way this box provides input to the user and will not in any way affect your actual drawings. When you finish typing (or not typing) left click Ok.
Figure 12.

Your block is now a part of the drawing. To check you can go to the Insert>Block menu for confirmation.
Figure 13.

If you wish to make other changes to your template now is a good opportunity to do so.
When you have finished making those changes, I recommend closing then restarting
the program.
I will get into more details concerning blocks in a future post. Please subscribe to my blog feed or check back regularly.
Larry P
Subscribe to:
Posts (Atom)


